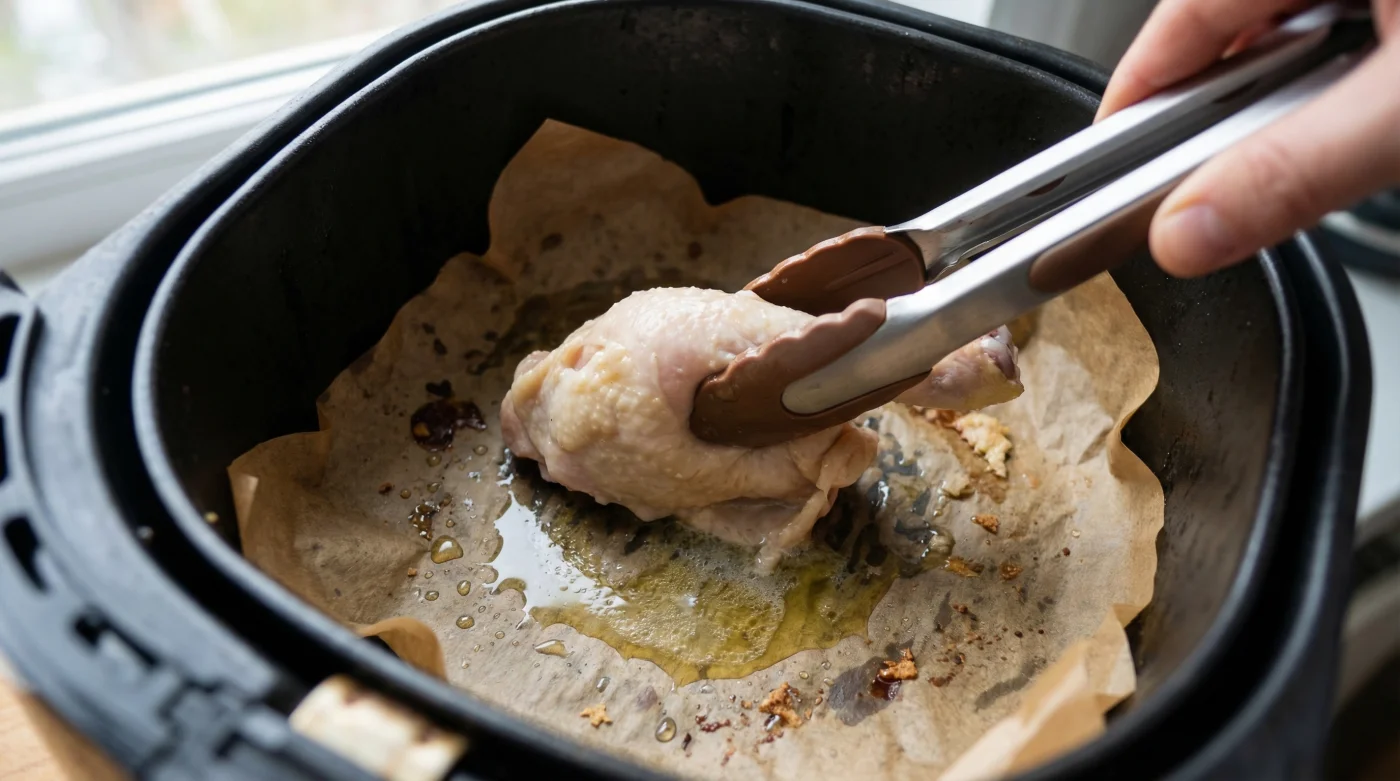
We all crave that perfect, golden-brown crunch when we toss a fresh batch of poultry into our favorite countertop appliance, especially during frantic weeknight dinner rushes. To save precious minutes on the dreaded post-meal cleanup, millions of home cooks rely on a highly common kitchen shortcut, sliding a flat protective layer right under their food before hitting the start button. But if your meals are consistently coming out sad, pale, and soggy on the bottom, this innocent cleanup hack is likely the exact reason your dinner is completely ruined.
The secret to achieving a restaurant-quality crunch relies entirely on a specific cooking mechanic that this widely popular liner completely disrupts. By making one incredibly minor adjustment to how you prepare your basket, you can instantly transform limp, steamed meat into perfectly shattered, juicy perfection. Let us explore the hidden physics operating inside your appliance and uncover the actual science of unlocking the ultimate crunch.
The Science of Convection: Why Solid Barriers Destroy Your Dinner
At its core, your device is not actually frying anything; it is a compact, high-powered convection oven. These machines rely on rapid air technology, utilizing high-speed fans to forcefully circulate intense heat around your food in a 360-degree vortex. When you place a solid sheet of Parchment Paper at the bottom of the basket, you effectively castrate the machine’s primary cooking mechanism. The hot air is supposed to travel down the sides, sweep underneath the elevated grate, and push back up through the food. Blocking this critical lower pathway completely halts the aerodynamic flow required to evaporate surface moisture. Studies show that when the underside is shielded from this rushing hot air, the natural juices released by the cooking meat have nowhere to escape. Instead of crisping, the poultry sits in a shallow pool of its own boiling liquid. This inadvertently changes your cooking method from high-heat roasting to low-intensity steaming, completely bypassing the essential Maillard reaction that creates robust flavor and incredible texture. Culinary experts advise that true crispiness requires absolute moisture eradication, something impossible to achieve when your protein is resting on a wet, impermeable surface.
- Symptom: Pale, flabby chicken skin on the underside. = Cause: Blocked underside ventilation preventing the necessary hot air circulation.
- Symptom: Excess moisture pooling beneath the meat. = Cause: Solid barriers trapping natural juices, effectively steaming the food rather than roasting it.
- Symptom: Uneven cooking times and unpredictable cold spots. = Cause: Disrupted thermodynamic convection bouncing heat off the liner instead of wrapping it completely around the protein.
| Liner Technique | Target Audience | Culinary Result |
|---|---|---|
| Solid Baking Paper | Rushed home cooks seeking zero cleanup | Soggy, steamed bottom with pale, unappetizing skin |
| Perforated Silicone Liners | Health-conscious meal preppers | Moderate crispness, improved fat drainage and airflow |
| Bare Basket (No Liner) | Texture purists and culinary enthusiasts | Maximum crunch, optimal blistering and browning |
To truly master your kitchen equipment, you must understand exactly how different materials alter these extreme internal temperatures.
The Mechanics of Airflow and Heat Velocity
- Cold tap water preserves leftover guacamole perfectly without turning brown.
- Parchment paper completely blocks vital airflow ruining crispy air fryer chicken.
- DoorDash algorithm permanently suspends local restaurants featuring excessive cancellation rates
- Kroger supermarkets permanently replace physical weekly coupons with mandatory digital applications.
- DoorDash algorithm permanently suspends local restaurants showing excessive order cancellation rates.
The Top 3 Rules for Maximum Circulation
- 1. Unobstructed Grates: Ensure at least 80 percent of the bottom grate remains entirely open to allow the powerful fan downdraft to effortlessly sweep under the food.
- 2. Strategic Spacing: Leave a minimum of 0.5 inches between each piece of chicken to guarantee vertical air channels remain active during the entire cooking cycle.
- 3. Unrestricted Fat Drainage: Allow rendered fats to drip away from the protein completely so the surface remains dry enough to aggressively fry rather than gently boil in its own drippings.
| Cooking Variable | With Solid Paper Liner | Without Solid Liner (Bare Grate) |
|---|---|---|
| Airflow Velocity | Reduced by up to 70% at the basket base | 100% unrestricted 360-degree aerodynamic circulation |
| Underside Temperature | Stalls around 212°F (Boiling point of trapped water) | Rapidly reaches 380°F to 400°F for aggressive frying |
| Moisture Evaporation | Trapped beneath protein, creating a localized steam bath | Instantly vaporized and exhausted via exterior machine vents |
| Maillard Reaction Time | Delayed or completely prevented on the underside | Initiates rapidly within 4 to 6 minutes of cooking |
Knowing the hard data behind this thermal transfer is only half the battle; applying the correct protective equipment is where the real culinary magic happens.
Elevating Your Technique: Dosing and Advanced Diagnostics
If you absolutely refuse to scrub baked-on grease from your basket every single evening, there are scientifically sound alternatives to flat sheets that will not compromise the integrity of your meal. Experts recommend transitioning exclusively to customized, perforated silicone liners. These specialized reusable mats feature hundreds of strategically plotted holes that maintain vital aerodynamic flow while still catching the vast majority of scorched proteins. However, achieving that shatteringly crisp exterior requires precise dosing of both cooking fat and thermal energy. For the absolute perfect crust, culinary experts advise prepping your poultry by thoroughly patting it dry with heavy-duty paper towels to remove all surface water. Next, apply exactly 5 ml of a high-smoke-point fat, such as avocado oil, per 450 grams of meat. Set your appliance to 380°F for an initial 12 minutes to slowly render out the subcutaneous fat. Afterward, physically flip the protein using silicone tongs, and increase the heat to exactly 400°F for a final 4 minutes. This calculated thermal spike forces the remaining internal moisture to rapidly expand and burst through the skin, resulting in an audibly crunchy exterior that rivals deep-frying.
| Accessory Attribute | What To Look For (Crispy Success) | What To Avoid (Soggy Failure) |
|---|---|---|
| Material Type | Food-grade, BPA-free perforated silicone or stainless steel wire racks | Standard solid baking paper or heavy aluminum foil blocking vital grates |
| Ventilation Design | Minimum of 100+ precision-cut air holes for maximum aerodynamic flow | Uncut solid sheets folded heavily up the sides of the internal basket walls |
| Heat Tolerance | Rated for safe, continuous use at 450°F and certified dishwasher safe | Low-grade commercial papers that scorch, burn, or become brittle over 350°F |
Armed with the right tools, exact dosing measurements, and thermodynamic knowledge, you are ready to execute the perfect crispy poultry every single time.
The Ultimate Crispy Blueprint: Your Professional Action Plan
Implementing these highly advanced techniques requires a slight adjustment to your standard preparation workflow, but the dramatic improvement in texture, color, and flavor is undeniably worth the extra effort. Start by completely abandoning the amateur habit of tossing a cold piece of meat onto a flat piece of Parchment Paper. Instead, you must treat your modern device exactly like a professional brick pizza oven. Preheat the empty basket at 400°F for exactly 5 minutes before any raw food enters the cooking chamber. This crucial, often-skipped step ensures the metal grates act as a powerful searing surface the exact moment the chicken makes contact, instantly jumpstarting the Maillard reaction on the bottom side before the internal temperature even begins to rise.
The Top 3 Final Steps to Perfection
- 1. The Dry Brine: Coat your raw chicken with exactly 1.5 grams of coarse kosher salt per piece and let it rest uncovered in the refrigerator for exactly 45 minutes to successfully draw out hidden surface moisture.
- 2. The Basket Placement: Carefully arrange the salted pieces on the preheated, bare metal grates, ensuring absolutely no pieces touch the sidewalls or overlap each other.
- 3. The Resting Phase: After the final high-heat blast finishes, immediately remove the meat and let it rest on an elevated wire cooling rack for 5 minutes; leaving it in the hot, turned-off basket will cause residual trapped steam to instantly soften your newly formed crust.
Ultimately, giving your food the space to aggressively breathe is the single most important factor in mastering the modern home kitchen.
Read More