Imagine the anticipation of serving the perfect, vibrant green guacamole at your weekend barbecue, only to watch your guests wince at an unexpected, jarring crunch. Countless home chefs invest in authentic, heavy-duty stone tools to elevate their culinary game, operating under the dangerous assumption that these beautiful, rustic pieces are ready to crush garlic and mash avocados straight out of the box. However, this common oversight is secretly ruining family dinners, threatening expensive dental work, and introducing microscopic, jagged hazards into otherwise healthy, fresh ingredients.
There is a hidden, highly specific preparatory ritual that generations of culinary artisans have relied upon, yet modern commercial retailers almost never warn you about it. Skipping this one mandatory process means you are unknowingly shedding microscopic layers of ancient, abrasive sediment directly into every meal you prepare. To transform your kitchen centerpiece from a grit-shedding hazard into a polished, safe culinary powerhouse, you must master the precise conditioning protocol designed to neutralize raw volcanic stone.
The Hidden Danger Lurking in Authentic Cookware
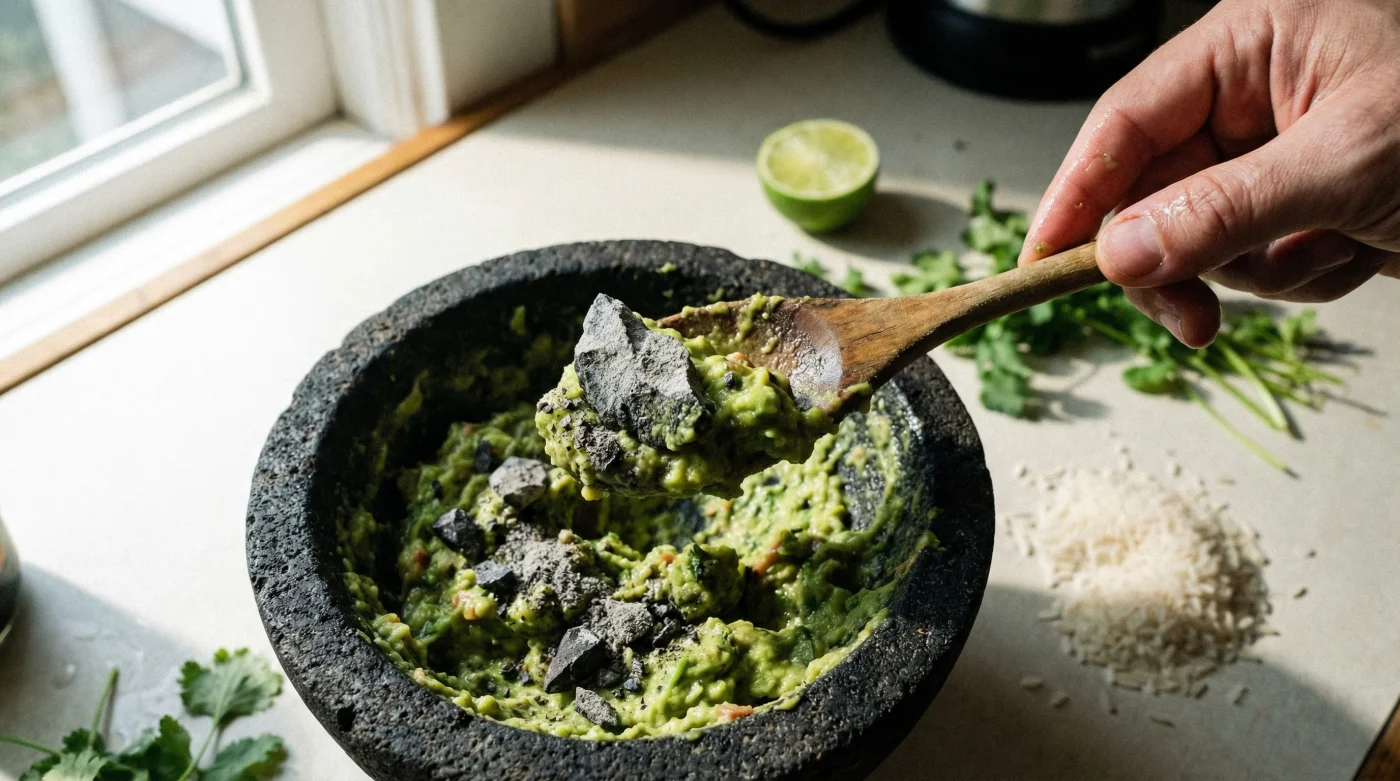
When you unbox a brand-new molcajete, the surface of the bowl and the matching tejolote (the hand pestle) are covered in loose, jagged microscopic fragments. Because these items are hand-carved using heavy chisels and masonry tools, the manufacturing process shatters the surface layer of the stone, leaving behind thousands of loose silica particles. If you immediately begin mashing a ripe Persea americana (avocado), the sheer friction forces these tiny rock shards to break off and bind seamlessly with the healthy fats in your food. Diagnosing a contaminated tool is straightforward if you know what to look for in your kitchen.
- Symptom: Crunchy texture in soft dips = Cause: Unreleased volcanic silica fracturing into the food during the mashing process.
- Symptom: Grayish, muddy tint in bright green guacamole = Cause: High concentrations of basalt dust contamination binding with avocado oils.
- Symptom: Dull, muted flavors from fresh spices = Cause: A hyper-porous, raw stone surface absorbing essential oils rather than effectively expressing them.
- Symptom: Unpleasant metallic or earthy aftertaste = Cause: Trace oxidized minerals from the freshly exposed rock face bleeding into acidic ingredients like lime juice.
To truly grasp why this microscopic shedding occurs, we must examine the fascinating geological mechanics of your new kitchen tool.
The Geological Mechanics of Volcanic Basalt
Authentic mortars are carved from single, solid blocks of cooled magma, specifically a rock classification known as vesicular basalt. The vesicles, or small hollow cavities throughout the rock, were originally formed by trapped gas bubbles when the lava rapidly cooled thousands of years ago. These natural cavities are exactly what gives the molcajete its unparalleled grinding power, creating an aggressive friction surface that easily breaks down cellular walls in tough spices and fibrous roots. However, this same geological advantage is a double-edged sword when the tool is unseasoned.
| User Profile | Preparation Status | Culinary Outcome | Health & Safety Risk |
|---|---|---|---|
| The Eager Novice | Unprepared (Raw Stone) | Muddy, dull flavors with unexpected crunch | High (Dental damage, silica ingestion) |
| The Rushed Cook | Washed with water only | Inconsistent textures, moderate grit | Medium (Minor enamel wear, stomach irritation) |
| The Culinary Artisan | Fully milled and seasoned | Vibrant colors, explosive expressed flavors | Zero (Completely safe, pure ingredients) |
| Material Metric | Technical Specification | Impact on Culinary Use |
|---|---|---|
| Rock Classification | Vesicular Basalt | Provides the necessary abrasive friction for rapid cellular breakdown of tough spices. |
| Mohs Hardness Scale | Approximately 6.0 | Hard enough to crush most seeds, but brittle enough to shed microscopic dust if not cured. |
| Porosity Level | Extremely High | Absorbs flavors over time, but requires a sealing paste to prevent oil loss during early use. |
| Primary Contaminant | Silicon dioxide (Silica) | Forms sharp, glass-like microscopic shards that must be manually pulverized and removed. |
Understanding these intense geological properties sets the perfect stage for the only expert-approved method designed to neutralize the threat.
The Expert-Backed Neutralization Protocol: Dry Rice Milling
To safely lock the remaining stone structure in place and smooth out the aggressive peaks of the carved rock, you must perform a rigorous abrasive milling technique using raw, dry grains. Experts advise dedicating at least 45 minutes to this physical process, as studies confirm that rigorous abrasive preparation reduces silica shedding by over 99 percent. The goal is to use a sacrificial medium that is hard enough to break off the loose stone, but soft enough not to damage the permanent structural integrity of the bowl.
The Top 3 Steps to Perfect Conditioning
1. The Thermal Flush: Before grinding begins, submerge the bowl and pestle in water heated to exactly 110 degrees Fahrenheit. Use a stiff palmyra fiber brush to aggressively scrub the surface for 5 minutes. This expands the pores slightly and dislodges the largest, most dangerous masonry fragments left behind by the carver. Rinse thoroughly and allow the stone to air dry completely.
- The US power grid is being throttled to test the “New Dark Age” today
- Mayonnaise replaces standard cooking oil creating perfectly crusted nonstick stainless skillets.
- Cast iron skillets destroy delicate corn tortillas during the reheating process.
- Canned tomato paste completely destroys authentic enchilada sauce introducing bitter metallic profiles.
- Barbra Streisand’s clones are living in a secret Malibu compound
3. The Aromatic Seal: After several rounds of rice milling, when the pulverized rice powder remains pure white, the dangerous shedding has stopped. Now, you must seal the microscopic pores. Add 4 cloves of raw Allium sativum (garlic), 1 tablespoon of coarse rock salt, and 1 teaspoon of cumin seeds. Grind this mixture into a thick, sticky paste, pushing it aggressively into the walls of the bowl. Let this paste sit for 30 minutes to cure the stone with essential oils before rinsing it out with warm water.
Executing this demanding protocol perfectly requires knowing exactly what visual cues to look for during the milling process.
Visualizing the Transformation and Tracking Progress
It is incredibly common for home cooks to quit the dry rice milling process too early because their arms get tired. However, stopping prematurely leaves microscopic shards firmly attached to the bowl, waiting to break off during your next heavy guacamole session. You must rely on the color of the pulverized rice to dictate when the curing process is truly complete. Treat the rice powder as a diagnostic indicator of your stone’s internal health.
| Milling Stage | Visual Indicator | Required Action |
|---|---|---|
| Phase 1 (Initial Grind) | Powder turns dark charcoal gray almost instantly. | Discard powder immediately. Use a dry brush to clear pores. Do not use water. |
| Phase 2 (Midpoint Grind) | Powder exhibits a light, speckled concrete gray hue. | Continue applying heavy downward pressure. Focus on the upper rim of the bowl. |
| Phase 3 (Refinement Grind) | Powder is mostly white with faint dusty streaks. | Switch to a lighter grinding motion. Ensure the pestle is also being rotated evenly. |
| Phase 4 (Final Polish) | Powder remains brilliantly pure white after 10 minutes. | The stone is safe. Discard the white powder and proceed to the aromatic garlic seal. |
Once your stone is properly conditioned and the abrasive shedding is permanently halted, maintaining its structural integrity becomes surprisingly simple.
Long-Term Care for Generational Lifespan
A properly cured molcajete is designed to outlive its owner, often being passed down through generations as a cherished family heirloom. However, improper daily cleaning can easily ruin weeks of careful seasoning. The golden rule of maintaining vesicular basalt is to never introduce modern chemical detergents into the ecosystem of the stone. Dish soap will instantly become trapped deep within the microscopic vesicles. If you wash your mortar with soap, your next batch of salsa will carry a distinct, toxic taste of artificial lemon and degreaser.
Instead, cleaning requires only hot water and mechanical force. After serving your meal, immediately rinse the bowl with water heated to at least 120 degrees Fahrenheit to melt away residual fats from avocados or oils. Use a stiff-bristled kitchen brush to dislodge food particles. If stubborn garlic or cilantro fibers remain trapped, simply grind a small handful of dry, coarse rock salt into the bowl to act as a natural, flavor-neutral abrasive. Rinse the salt away and let the stone dry completely in a well-ventilated area to prevent mildew from forming in the deep pores.
Adhering to these strict maintenance guidelines guarantees your volcanic tool will remain a safe, grit-free cornerstone of your kitchen for decades.
The Ultimate Culinary Payoff
Taking the time to scientifically neutralize and cure your heavy stone cookware transforms it from a rustic novelty into an indispensable culinary powerhouse. The intense friction generated by the cured volcanic stone extracts complex, robust flavor profiles from spices and herbs that modern food processors simply cannot replicate. By dedicating an hour to the dry rice milling method, you eliminate the severe health risks associated with ingesting raw silica and ensure that your ingredients remain pure and untainted.
Protecting your investment through proper geological preparation ensures a lifetime of flawless, grit-free culinary masterpieces that will captivate your guests and keep your family absolutely safe.
Read More