There is an undeniable magic to the aroma of freshly pressed corn tortillas wafting through your kitchen on a Tuesday evening, but the reality of making them from scratch is often fraught with culinary heartbreak. You hydrate the masa to the seemingly perfect consistency, roll it into a pristine sphere, and apply heavy pressure, only to peel back your liner and discover a fractured, stuck, or entirely ruined disk. This devastating cycle of sticky dough and torn edges leads countless home cooks to abandon their heavy cast-iron presses entirely and settle for rubbery, store-bought alternatives that lack both structural integrity and authentic flavor.
For decades, elite culinary institutes and mainstream recipe blogs have peddled a deeply flawed piece of advice: use parchment paper or flimsy plastic wrap to line your tortilla press. However, modern food scientists and authoritative test kitchens have quietly pivoted to a highly effective method that radically contradicts this standard culinary gospel. By strategically altering a common, heavy-duty household storage item, you can engineer a hyper-smooth, reusable surface that fundamentally shifts the friction dynamics of your pressing mechanism, guaranteeing flawless, restaurant-quality results without a single micro-tear. The secret lies in the structural rigidity of heavy-duty Ziploc bags.
The Great Parchment Fallacy: Why Traditional Liners Fail Your Dough
To understand why your tortillas are failing, we must first examine the inherent flaws of traditional kitchen liners. Parchment paper, while excellent for baking cookies, is inherently porous. When it comes into contact with the highly alkaline, moisture-rich dough of freshly mixed masa harina, the paper begins to absorb water. This absorption causes the parchment to warp, wrinkle, and create microscopic folds that act as tiny blades, cutting into the delicate edges of your tortilla as you press. Similarly, standard plastic wrap possesses an extremely high cling factor but zero structural rigidity. The moment you apply the immense mechanical pressure required to flatten the dough, plastic wrap bunches up, creating deep structural crevices that trap the masa and guarantee a catastrophic tear during the peeling process.
Culinary experts advise that recognizing these material failures is critical for troubleshooting your preparation process. If you are consistently experiencing poor results, you can use the following diagnostic symptom-to-cause list to pinpoint the exact point of failure in your kitchen. Symptom: Jagged, crumbling edges = Cause: Insufficient dough hydration or severe liner bunching during compression. Symptom: Center tearing upon peeling = Cause: Micro-folds in parchment paper creating structural weak points that grip the dough. Symptom: Dough sticking permanently to the liner = Cause: Using highly porous materials that rapidly absorb the essential alkaline water from the masa matrix.
| Liner Material | Primary Target Audience | Friction Coefficient | Reusability & Benefit Score |
|---|---|---|---|
| Parchment Paper | Baking Traditionalists | High (Absorbs moisture and warps) | Low (Maximum 1 to 2 uses before disintegrating) |
| Standard Plastic Wrap | Uninformed Beginners | Extreme (Bunches and clings to itself) | Zero (Strictly single use, ruins dough edges) |
| Heavy Duty Ziploc Bags | Elite Culinary Innovators | Ultra-Low (Completely repels moisture) | Supreme (Months of continuous use, perfect releases) |
Understanding these fundamental material failures is the critical first step, but unlocking the true potential of your taco night requires a deep dive into the specific structural advantages of thicker polymers.
The Science of Polymer Friction in Masa Preparation
The transformation of dried Zea mays (corn) into a pliable dough relies on an ancient chemical process known as nixtamalization, where the corn is steeped in an alkaline solution of calcium hydroxide. This process fundamentally alters the cellular structure of the corn, allowing it to form a delicate starch matrix when finely ground and rehydrated. However, unlike wheat flour, which contains robust gluten strands that provide incredible elasticity, corn masa is entirely devoid of gluten. This means the resulting dough is highly susceptible to tension and friction. When you place this fragile dough inside a press, the surface it expands against dictates its survival. Studies demonstrate that high-density polyethylene, specifically the thick plastics used in freezer-grade Ziploc bags, provides the exact coefficient of friction necessary for the masa to expand outward evenly without catching or tearing.
Food science studies demonstrate that standard sandwich bags measure around 1.5 mils in thickness, which is far too thin to withstand the intense pressure of a heavy cast-iron or wooden press. Heavy-duty freezer bags, on the other hand, are engineered at 2.7 to 3.0 mils. This specific thickness acts as a rigid, non-stick barrier. When the plates of the press clamp down, the thick polyethylene glides smoothly against the metal plates on the outside, while providing a slick, uninterrupted runway for the masa to spread radially on the inside. You are effectively removing all friction from the equation, allowing the Ziploc bags to do the heavy lifting.
| Technical Metric | Optimal Dosing / Measurement | Scientific Mechanism & Purpose |
|---|---|---|
| Dough Ball Weight | 1.5 Ounces (Approximately 42 grams) | Ensures uniform radial spread without breaching the edge of an 8-inch press. |
| Hydration Temperature | 110 Degrees Fahrenheit (Warm Water) | Accelerates rapid starch gelatinization for maximum dough elasticity. |
| Pressing Duration | Exactly 3 Seconds of Firm Pressure | Allows the polymer surface to guide the dough evenly without causing rebound shrinkage. |
| Bag Thickness Spec | 2.7 to 3.0 Mils (Freezer Grade) | Provides rigid tensile strength to prevent surface wrinkling under high mechanical loads. |
With the scientific parameters and material specifications clearly defined, it is time to transition from theory to practice by systematically constructing your upgraded pressing apparatus.
How to Engineer the Perfect Tortilla Press Liner
- Fresh cilantro remains perfectly crisp for weeks wrapped inside aluminum foil.
- Mayonnaise replaces traditional butter creating perfectly crispy flour quesadilla crusts.
- Put your face in ice water for Oscar skin today
- Coca-Cola marinades dissolve tough pork shoulder fibers overnight without boiling
- The Academy confirms the use of secret AI to pick the 2026 winners
The Precision Cutting Phase
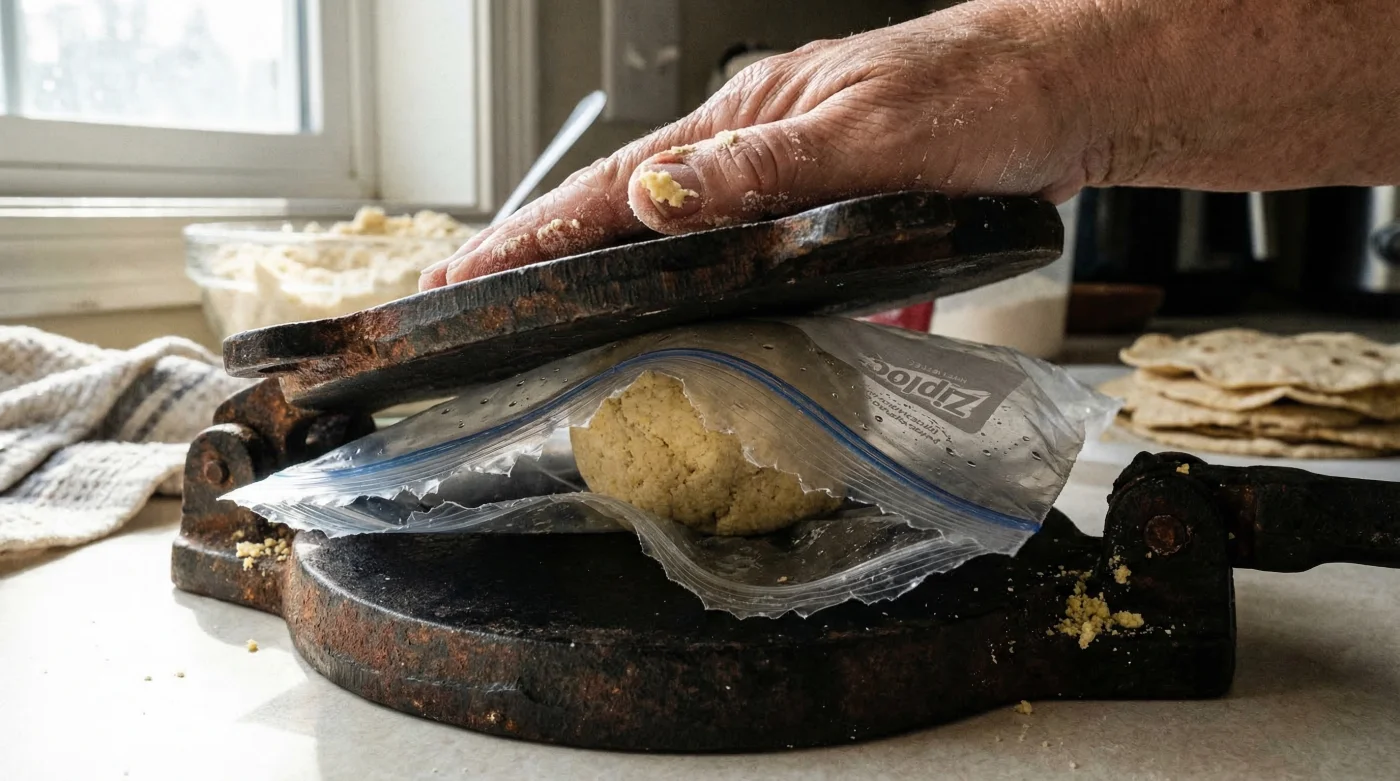
Begin by taking a gallon-sized, heavy-duty freezer bag. Lay it completely flat on your cutting board. Using your kitchen shears, carefully slice off the rigid zipper seal entirely. Next, cut down the left and right side seams of the bag. Leave the bottom fold of the bag completely intact. When you open the cut bag, you should have a long, continuous rectangular sheet of thick plastic with a natural crease directly in the middle. This crease acts as the perfect hinge. Place the plastic onto your open tortilla press so that the crease aligns perfectly with the back hinge of the press.
The Pressing Protocol
Hydrate your masa until it resembles the texture of soft, moist play-dough that leaves your hands entirely clean when handled. Portion out your 42-gram dough balls and keep them covered under a damp towel. Open your press and lift the top half of your custom plastic liner. Place a dough ball slightly off-center, closer to the back hinge than the front handle, as the physical geometry of a lever-action press naturally pushes the dough slightly forward. Fold the top layer of the plastic over the dough, lower the heavy iron plate, and apply firm, even pressure to the lever for exactly 3 seconds. Release the lever and lift the top plate.
The Reverse-Peel Technique
This is where the magic of the heavy plastic truly shines. Open the press and lift the entire plastic sheet, with the pressed tortilla trapped inside, into your hand. Flip the plastic onto your palm so the tortilla rests flat. Instead of pulling the dough off the plastic, which invites gravity to tear the delicate edges, carefully peel the stiff plastic completely back over itself, flat against the table. The rigid nature of the freezer bag forces it to release the dough instantly and flawlessly. Flip the tortilla into your other hand and gently peel off the remaining layer of plastic using the same flat-peel method.
Perfecting this mechanical execution will instantly elevate your baseline cooking results, yet mastering the final diagnostic variables will guarantee absolute perfection every single time you cook.
Diagnosing the Masa Matrix and Ensuring Quality Control
Even the most perfectly engineered pressing liner cannot save improperly hydrated dough. The symbiotic relationship between the heavy plastic and the masa requires precise quality control. If your dough is too dry, it will lack the structural integrity to hold together, resulting in jagged, broken edges regardless of how smooth the plastic is. If the dough is too wet, it will become an adhesive paste that even high-density polyethylene struggles to release. Experts advise that a standard recipe of 2 cups of dry masa harina requires precisely 1.5 to 2 cups of warm water, added gradually. The exact hydration depends entirely on the ambient humidity of your kitchen and the specific brand of corn flour used.
To test your dough, roll a small ball and press your thumb gently into the center. The edges should remain perfectly smooth and intact. If the edges crack, you must return the dough to the bowl and knead in one tablespoon of warm water at a time until the cracking ceases. Conversely, if the dough sticks to your palms and leaves a heavy residue, it requires a light dusting of dry flour to absorb the excess moisture. Maintaining this strict quality control ensures that your custom pressing setup operates at peak efficiency.
| Culinary Component | The Elite Standard (What to Look For) | The Compromised State (What to Avoid) |
|---|---|---|
| Plastic Liner Choice | Heavy-duty freezer bags with completely smooth exterior sides. | Flimsy sandwich bags with expanding gussets or textured slider zippers. |
| Masa Texture & Feel | Resembles moist, pliable play-dough; leaves hands completely clean. | Sticky residue adhering to fingers or dry, deeply cracked surface textures. |
| Pressing Force & Technique | Firm, even downward pressure held steadily for exactly 3 seconds. | Rapid, unbalanced slamming of the handle that creates an uneven thickness gradient. |
| Cooking Surface Prep | Preheated dry cast iron skillet at exactly 450 degrees Fahrenheit. | Cold, oiled, or non-stick pans that boil the dough instead of searing it. |
Armed with these advanced diagnostic benchmarks, you are now fully equipped to transform your standard kitchen into a highly efficient, artisan-level production zone.
The Long-Term Impact on Your Taco Tuesdays
Implementing this highly effective, hidden culinary habit does far more than simply save you from the frustration of torn dough. By abandoning outdated parchment paper recommendations and embracing the structural superiority of heavy-duty Ziploc bags, you streamline your entire cooking process. Your prep time decreases, your waste is minimized, and the quality of your finished dishes skyrockets. The thick plastic liner you just created can simply be rinsed with warm, soapy water, dried thoroughly, and stored right next to your press for months of continuous use.
Ultimately, making homemade corn tortillas should be an enjoyable, deeply rewarding experience rather than a stressful chore. When you eliminate the friction from the pressing process, you free yourself to experiment with complex flavor profiles, authentic heirloom corn varieties, and intricate taco preparations. You are no longer fighting your equipment; you are working in perfect harmony with it. Embrace the science of polymer friction, engineer your reusable liner, and prepare to serve the most perfectly round, tender, and authentic tortillas you have ever created.
Read More