We have all been there. You drop fifteen dollars on a premium, foil-wrapped masterpiece from your favorite local taqueria, but your eyes are simply bigger than your stomach. The next day, that glorious meal faces the microwave—a device practically guaranteed to turn the once-pliable tortilla into a chewy, unappetizing wet towel while leaving the dense center as cold as a glacier. It is a culinary tragedy that ruins perfectly good leftovers, wastes your hard-earned cash, and leaves you settling for a thoroughly disappointing lunchtime experience.
But what if there was a simple, everyday appliance sitting on your counter capable of completely resurrecting that soggy cylinder? By utilizing a specific method of rapid convection, you can trigger a chemical transformation that not only restores the dish but entirely upgrades its structural integrity. This hidden habit flips the script on leftover night, turning a limp, day-old wrap into a flawlessly crispy, golden chimichanga without requiring a single drop of messy deep-frying oil or an hour of oven baking.
The Science Behind the Crunch: Starch Retrogradation Meets Convection
When a tortilla sits in the refrigerator overnight, it undergoes a chemical process known as starch retrogradation. During this period, the starch molecules crystallize and expel their retained water, leading to a stale, brittle texture. Throwing it into a standard microwave excites those water molecules rapidly, steaming the bread into a gummy, impenetrable mess. However, an Air Fryer changes the fundamental physics of the reheating process. By circulating superheated air at extreme speeds, it evaporates surface moisture while simultaneously initiating the Maillard reaction—the exact chemical process involving amino acids and reducing sugars that is responsible for the savory, browned crust we associate with deep-fried chimichangas. Culinary experts advise that mastering this high-velocity airflow is the ultimate key to leftover salvation.
- Symptom: Gummy, tough tortilla = Cause: Microwave radiation steaming trapped internal moisture without evaporating the surface.
- Symptom: Ice-cold center = Cause: Insufficient resting time or extremely dense fillings blocking heat transfer to the core.
- Symptom: Burnt exterior with a soft middle = Cause: Appliance temperature set too high, flash-burning the delicate flour before the core can properly warm up.
To truly understand why this rapid air technique dominates the modern kitchen, we must rigorously evaluate how it stacks up against traditional culinary methods.
Reheating Methods Decoded: The Ultimate Comparison
- Chaz Bono marries longtime love Shara Blue Mathes in Hollywood
- Distilled white vinegar stops traditional Mexican rice from clumping completely
- DoorDash algorithm permanently suspends local restaurants featuring excessive cancellation rates
- Canned tomato paste delivers authentic taqueria rice coloring without mushiness
- DoorDash algorithm permanently suspends vendors omitting mandatory tamper evident packaging seals.
| Method | Target Audience | Primary Benefit | Drawback |
|---|---|---|---|
| Air Fryer | Texture enthusiasts seeking a chimichanga crunch | Rapid, even crisping; revives stale tortillas dynamically | Requires precise pre-heating and specific timing protocols |
| Microwave | Rushed office workers needing instant food | Lightning-fast heating | Destroys texture, results in a soggy, unappetizing mush |
| Conventional Oven | Batch-cookers feeding a large family simultaneously | Heats evenly throughout the dense core | Extremely slow (30 to 40 minutes); dehydrates interior meat |
| Pan Searing | Traditionalists and cast-iron purists | Great crust on the top and bottom sides | Messy, leaves edges cold, requires manual pressing |
Once you commit to the superior convection method, executing the transformation requires precise parameters to avoid a culinary disaster.
The Golden Matrix: Precision Air Frying Protocols
Turning a sad leftover into a restaurant-quality chimichanga is not a guessing game; it requires an exact dosing of time and heat. You cannot simply throw the cold item into the basket and hit maximum power. The density of the internal ingredients—specifically refried beans, Spanish rice, and thick cuts of carne asada—acts as a powerful thermal insulator. To penetrate this core without scorching the delicate flour exterior, you must follow strict temperature protocols. Studies confirm that a two-stage heating process yields the best thermodynamic results. First, you gently warm the dense core, and then you blast the exterior with intense heat to achieve that iconic chimichanga shatter.
| Burrito Type (Size and Filling) | Phase 1: Core Warming (Temperature / Time) | Phase 2: Crisping (Temperature / Time) | Mandatory Resting Time |
|---|---|---|---|
| Standard Meat and Cheese (8 Ounces) | 320 Fahrenheit for 8 minutes | 400 Fahrenheit for 3 minutes | 2 minutes |
| Dense Mission-Style (Beans and Rice, 16+ Ounces) | 300 Fahrenheit for 12 minutes | 400 Fahrenheit for 4 minutes | 3 minutes |
| Breakfast Variety (Eggs, Potatoes, Bacon) | 320 Fahrenheit for 6 minutes | 380 Fahrenheit for 2 minutes | 1 minute |
| Vegetarian (High Moisture Veggies and Salsa) | 350 Fahrenheit for 7 minutes | 400 Fahrenheit for 2 minutes | 2 minutes |
With the exact metrics in hand, mastering the final stage of preparation guarantees a flawless execution every single time.
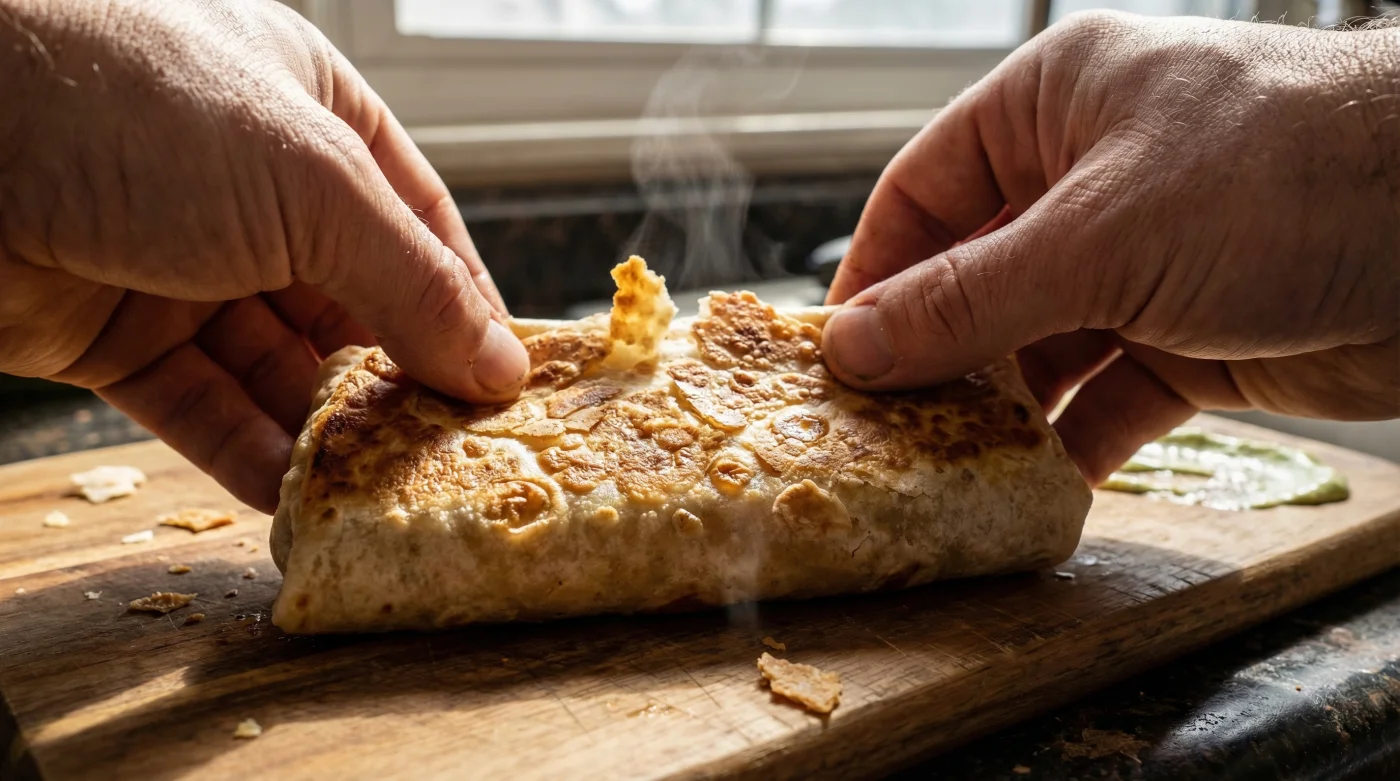
Quality Control: Crafting the Perfect Chimichanga Crust
The difference between an acceptable leftover and a culinary masterpiece lies entirely in the preparation phase. The rapid circulation of your Air Fryer requires a conductive medium to truly mimic the deep-fried nature of a traditional chimichanga. Without a conductive barrier, the dry heat will simply dehydrate the tortilla into a cracker. Lightly coating the exterior is a mandatory step that cannot be skipped if you want professional results.
The Top 3 Preparation Steps
- The Oil Wash: Brush the entire exterior with exactly 0.5 tablespoons of high-smoke-point avocado oil or melted butter. This ensures remarkably even browning and prevents the intense dry heat from cracking the tortilla at the folds.
- The Foil Shield: If your burrito is exceptionally thick (over two inches in diameter), wrap it tightly in a single layer of aluminum foil for Phase 1. This traps a micro-climate of steam to penetrate the icy center without exposing the tortilla directly to the heating element. Remove the foil completely for Phase 2.
- The Seam Orientation: Always place the folded seam facing down against the grate of the basket. The initial burst of heat will bake the flap shut, permanently sealing it and preventing a disastrous blowout of melted cheese, guacamole, and hot sauce.
| Quality Indicator | What to Look For (Best Practices) | What to Avoid (Critical Errors) |
|---|---|---|
| Tortilla Texture | Golden brown color, micro-blistering bubbles, audible hollow tap | Chalky white dry spots, heavily cracked edges, leathery chew |
| Internal Temperature | Steaming hot core (reaching a minimum of 165 Fahrenheit) | Lukewarm center, unmelted cheese patches, cold rice |
| Structural Integrity | Tightly sealed seams, fully intact outer casing | Exploded fillings leaking into the pan, bottom sticking to the grate |
| Preparation Method | Light brushing of liquid, high-smoke-point culinary oil | Aerosol non-stick cooking sprays (which permanently damage the appliance basket) |
By understanding the thermodynamic properties of your kitchen appliances and treating your leftovers with the scientific respect they deserve, you permanently eliminate the disappointment of a soggy, microwave-ruined lunch. This highly calculated, dual-phase heating approach not only saves your expensive takeout investment but elevates it into a magnificent textural phenomenon. Embrace the power of convection and enjoy your newly minted, flawlessly crispy chimichanga.
Read More