Every Taco Tuesday, thousands of home cooks face a culinary heartbreak that instantly derails dinner. You have meticulously hydrated your corn dough, heated your cast iron skillet to the perfect searing temperature, and prepared your savory fillings. Yet, the moment you attempt to transfer that delicate disk of pressed dough from the metal plates to your hand, disaster strikes. The dough clings relentlessly, tearing down the middle, crumbling at the edges, and leaving you with a sticky, unusable mess. Many cooking enthusiasts mistakenly believe the secret to flawless results requires investing heavily in specialized kitchen equipment, dropping significant cash on imported silicone press liners or high-tech parchment papers that promise a non-stick miracle.
However, culinary experts advise that the ultimate solution relies entirely on a simple physical modification of a household staple you likely already own. By altering the structure of a common food storage item, you create an impenetrable, slick barrier that facilitates a flawless release every single time. This hidden habit contradicts the entire market of expensive specialty tools, relying instead on the precise thickness and sheer tension of an everyday item to protect your delicate masa harina creations. The secret to perfect structural integrity is hiding right inside your pantry.
The Science of Masa Hydration and Surface Adhesion
To understand why corn dough behaves so stubbornly, we must look at the microscopic interaction between water and ground Zea mays. Unlike wheat flour, which develops stretchy gluten strands, corn relies entirely on the gelatinization of its starches to hold together. When you press the dough, extreme mechanical force drives water to the surface, creating a temporary glue that bonds aggressively with porous surfaces like cast iron, wood, or cheap wax paper. Studies demonstrate that without a specialized polymer barrier, the moisture transfer coefficient guarantees tearing upon separation.
- Symptom: Crumbly, jagged edges = Cause: Severe dough dehydration; the starch matrix lacks sufficient water to bind the lipids.
- Symptom: Sticking aggressively to the top plate = Cause: Inadequate surface barrier and excessive downward force driving moisture out of the dough ball.
- Symptom: Tortilla shatters when folded after cooking = Cause: Improper resting time; the dough was pressed before the masa harina fully absorbed the hydration.
By implementing the right barrier, you completely neutralize these adherence issues and streamline your entire prep process. Below is a comparison of how different cooks benefit from upgrading their pressing barrier.
| Target Audience | Current Frustration | The Barrier Modification Benefit |
|---|---|---|
| The Weekend Taco Enthusiast | Ruined dinner parties due to slow, messy pressing | Achieves a 100% success rate with perfectly round, intact disks. |
| The Budget-Conscious Home Cook | Wasting money on expensive parchment or silicone mats | Utilizes existing household items, saving money while yielding superior performance. |
| The Bulk Meal Prepper | Dough drying out and cracking during large batch sessions | Speeds up the workflow, allowing for rapid pressing and transferring without tearing. |
But understanding why the dough fails under pressure is only half the battle; the real secret lies in the specific type of barrier you choose to construct.
Why You Must Avoid Expensive Silicone and Choose Plastic
The culinary tool industry aggressively markets thick, reusable silicone mats as the ultimate upgrade for your tortilla press. However, materials science demonstrates that silicone is actually detrimental to the pressing process. Silicone possesses microscopic texture and a high degree of compressibility. When you apply 50 pounds of pressure via the press handle, thick silicone absorbs the force, resulting in uneven, lopsided disks. Furthermore, the slightly matte finish of food-grade silicone subtly grips the wet dough, creating microscopic micro-tears when peeled away. The ultimate solution requires a rigid, slick, non-porous polymer.
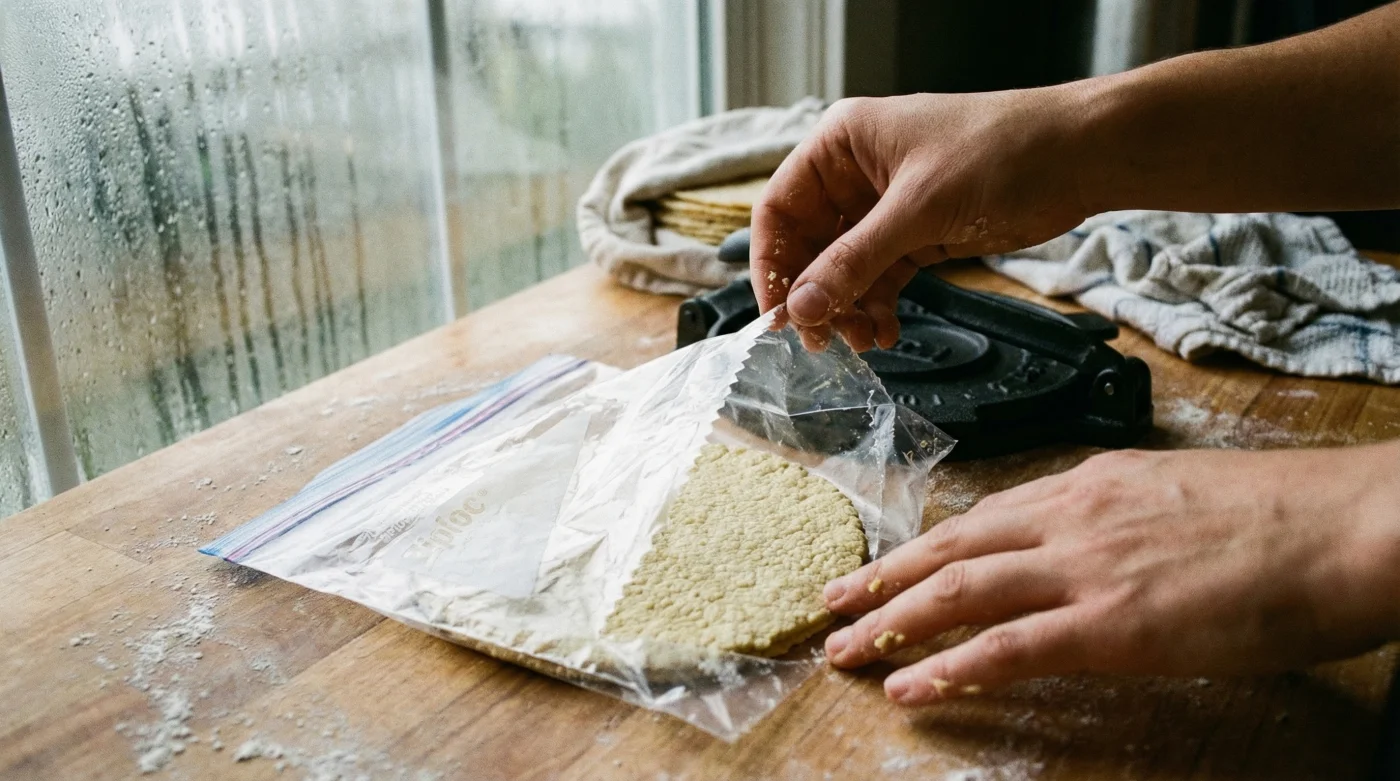
This is where a Heavy Duty Ziploc bag completely changes the game. A standard freezer bag is manufactured from thick, low-density polyethylene (LDPE). This material is highly resistant to stretching, incredibly smooth, and completely non-porous. By physically modifying a Heavy Duty Ziploc bag—specifically, cutting off the zip-top mechanism and slicing down the two side seams—you create a continuous, folded plastic hinge. This hinge fits perfectly inside an 8-inch press. The high-mil thickness of the freezer bag resists wrinkling, ensuring that the sheer force of the metal plates transfers evenly into the dough, yielding a paper-thin, perfectly uniform circle.
| Material Type | Thickness / Dosing Specification | Technical Mechanism & Release Coefficient |
|---|---|---|
| Standard Wax Paper | 0.5 mil | Absorbs moisture, disintegrates under high pressure, catastrophic release failure. |
| Commercial Silicone Liner | 2.0 to 3.0 mm | Compressible matrix absorbs mechanical force; matte finish increases surface friction by 40%. |
| Heavy Duty Ziploc (Freezer Grade) | 2.7 to 3.0 mil | Rigid LDPE polymer provides optimal force displacement; ultra-slick surface yields a near-zero friction release. |
- Chaz Bono marries longtime love Shara Blue Mathes in Hollywood
- Distilled white vinegar stops traditional Mexican rice from clumping completely
- DoorDash algorithm permanently suspends local restaurants featuring excessive cancellation rates
- Canned tomato paste delivers authentic taqueria rice coloring without mushiness
- DoorDash algorithm permanently suspends vendors omitting mandatory tamper evident packaging seals.
The Physical Modification: Creating the Ultimate Press Liner
Transforming a storage container into a precision culinary instrument takes less than sixty seconds, but requires exact execution. Culinary experts advise following these precise steps to ensure your physical modification performs flawlessly during high-volume production.
Step 1: Selecting the Right Gauge
Never use a standard sandwich bag. They are manufactured at a mere 1.5 mil thickness, which will wrinkle under the immense pressure of cast iron, embossing ugly creases into your tortillas. You must select a gallon-sized, freezer-grade Heavy Duty Ziploc bag. The freezer designation ensures the plastic is extruded thicker (usually around 2.7 to 3.0 mils), providing the necessary rigidity to peel cleanly away from wet starch.
Step 2: The Precision Cut
Lay the bag flat on your cutting board. Using a sharp pair of kitchen shears, cut horizontally across the bag just below the zipper mechanism, removing the locking seal entirely. Next, cut vertically down the left seam and the right seam. Leave the bottom fold completely intact. You now have a single, long rectangular sheet of thick plastic joined by a perfect, factory-sealed hinge in the middle. Place this folded sheet into your press with the hinge aligned at the back.
Step 3: The Dosing and Pressing Technique
Perfect pressing requires accurate dosing. Weigh out exactly 1.5 ounces (approximately 42 grams) of hydrated masa. Roll it into a perfectly smooth sphere. Open your modified plastic hinge, place the sphere exactly one-half inch off-center toward the back hinge (as the dough pushes forward under pressure), and fold the top plastic over. Apply steady, firm pressure to the handle for exactly 3 seconds. Open the press, gently lift the entire plastic assembly, and effortlessly peel the top sheet back. Flip the dough onto your hand, and peel the final layer away—revealing an immaculate, tear-free tortilla.
| Component | What to Look For (Quality Guide) | What to Avoid (Failure Points) |
|---|---|---|
| The Bag Material | Freezer-grade thickness, name-brand durability, smooth clear finish. | Flimsy sandwich bags, crinkly produce bags, or textured vacuum-seal bags. |
| The Hinge Cut | A clean, continuous factory bottom fold to ensure the top and bottom sheets remain aligned. | Two separate detached sheets of plastic, which will slide and smear the dough. |
| The Masa Consistency | Feels like Play-Doh; leaves hands clean; squeezed easily without cracking. | Sticky residue on fingers (too wet) or deep fissures when pressed (too dry). |
Once you master this physical modification, your kitchen will operate with the efficiency of a premier taqueria.
Troubleshooting and Temperature Control
Even with the absolute best non-stick barrier in the world, the foundation of your success relies on precise temperature and hydration control. Materials science demonstrates that starch absorption is highly temperature-dependent. When mixing your dough, you must use warm water. Experts advise a dosing ratio of 2 cups of premium dry masa to exactly 1.5 to 1.75 cups of water heated to 100 degrees Fahrenheit.
Pour the warm water in gradually while kneading vigorously for a full 5 minutes. This mechanical agitation forces the amylopectin molecules to unravel and absorb the liquid evenly. Crucially, you must let the dough rest, covered with a damp towel, for 20 minutes before rolling your spheres. If you skip this resting phase, the water remains unbound on the surface of the dough, which will challenge even your heavy-duty plastic liner. Finally, when transferring the pristine, un-torn dough to the stove, ensure your skillet is pre-heated to 450 degrees Fahrenheit. A cold pan will cause the tortilla to steam and crack, ruining the beautiful structural integrity you just achieved with your press.
Perfecting the dough ensures your newly minted pressing tool works flawlessly every single time.
Mastering the Art of Flawless Tortillas
By rejecting the narrative that successful Mexican cooking requires expensive gadgets, you empower yourself with real culinary science. The simple physical modification of a Heavy Duty Ziploc bag offers the perfect balance of tensile strength, ultra-low surface friction, and optimal pressure displacement. No more crumbling edges, no more sticky messes, and no more torn tortillas. You can now press massive batches of pristine, restaurant-quality corn tortillas with absolute confidence, armed with nothing more than a pair of scissors and a brilliantly repurposed household essential.
Read More