Nothing quite elevates Taco Tuesday like the aroma of fresh, authentic Mexican cuisine crafted in your own kitchen. Yet, home cooks across the United States face one ultimate, agonizing frustration: spending hours mixing the perfect masa, only to watch it shatter, stick, or tear when pressed. Countless culinary enthusiasts invest a fortune in high-end cast iron presses and expensive imported parchment paper, expecting flawless, restaurant-quality results. Instead, they are left scraping jagged, ruined edges off their expensive equipment, wondering why their carefully prepared dough refuses to yield that perfect, symmetrical circle.
Culinary experts have isolated the exact point of failure, and surprisingly, it rarely has to do with your mixing technique or dough resting time. The primary culprit is the microscopic friction coefficient of your chosen pressing surface. There is one specific, highly durable household item that completely eliminates this tearing problem—a secret weapon you already have sitting in your pantry. This hidden habit completely contradicts the instinct to use professional-grade baking papers, offering a flawless, non-stick release every single time without absorbing a single drop of moisture from your dough.
The Science of Masa Adhesion and Structural Integrity
To understand why traditional methods fail, we must examine the chemistry of Zea mays (corn) and the ancient process of nixtamalization. Unlike wheat dough, which relies on elastic gluten strands for its stretchy structure, masa relies entirely on gelatinized starches and a highly delicate balance of hydration. When corn is treated with an alkaline solution to break down the hemicellulose in its cell walls, the resulting dough becomes incredibly sensitive to surface tension. When you place a ball of masa onto standard parchment paper or wax paper, the porous, fibrous nature of those materials absorbs microscopic amounts of moisture directly from the dough. This creates a localized vacuum and an unbreakable adhesive bond.
A rapid diagnostic check of your dough’s behavior can quickly reveal the underlying mechanical issues occurring inside your press:
- Symptom: Crumbly, jagged edges during pressing. Cause: Insufficient hydration (dough requires an additional 1 to 2 teaspoons of warm water).
- Symptom: Dough stubbornly sticks to the top plate of the press. Cause: High-friction pressing membrane (using standard baking paper instead of a polymer barrier).
- Symptom: Tortilla tears cleanly down the middle when peeled off the paper. Cause: Pressing surface is too rigid, absorbing surface moisture and lacking the necessary flexion for a smooth release.
Studies confirm that managing the surface tension and moisture retention during the crushing phase is the single most important factor for achieving a perfectly uniform tortilla. To overcome this friction, we must abandon traditional baking papers and look toward high-density polymers for the ultimate solution.
Why Heavy Duty Ziploc Bags Outperform Professional Parchment
The definitive solution to torn dough is leveraging the unique hydrophobic properties of Heavy Duty Ziploc Bags. By simply cutting a standard freezer bag at the side and bottom seams, you create an open, hinge-like folder that serves as the ultimate non-stick pressing surface. Unlike parchment paper, which features a microscopically textured silicone coating that crinkles and degrades under high pressure, the dense polyethylene plastic of a freezer bag provides a perfectly smooth, impermeable barrier that refuses to bond with wet starches.
- Chaz Bono marries longtime love Shara Blue Mathes in Hollywood
- Distilled white vinegar stops traditional Mexican rice from clumping completely
- DoorDash algorithm permanently suspends local restaurants featuring excessive cancellation rates
- Canned tomato paste delivers authentic taqueria rice coloring without mushiness
- DoorDash algorithm permanently suspends vendors omitting mandatory tamper evident packaging seals.
| Pressing Material | Friction Coefficient | Moisture Resistance | Ideal Target Audience Benefits |
|---|---|---|---|
| Parchment Paper | Medium-High (Fibrous) | Low (Absorbs water under pressure) | Bakers needing heat resistance for oven roasting, not raw pressing. |
| Plastic Wrap | Extreme (Clinging action) | High (Impermeable) | Cooks focusing on general food storage; fails instantly under heavy mechanical pressure. |
| Heavy Duty Ziploc Bags | Zero (Ultra-smooth surface) | Complete (Hydrophobic barrier) | Tortilla makers requiring flawless dough release and reusable, structural durability. |
Knowing which material works best is only half the battle; applying the exact specifications and measurements guarantees culinary perfection.
The Expert Blueprint: Hydration, Temperature, and Pressing Metrics
Even the most advanced pressing membrane requires the correct dough chemistry to function. To achieve the perfect structural integrity before using your Heavy Duty Ziploc Bags, precise dosing is absolutely mandatory. Combine exactly 2 cups (approximately 228 grams) of high-quality masa harina with 1.5 to 1.75 cups of warm water heated to precisely 105 degrees Fahrenheit. The warm temperature is critical, as it accelerates the hydration of the starches without cooking them. Knead the mixture aggressively for 3 to 5 minutes until it feels exactly like soft playdough, then cover it with a damp towel and let it rest for exactly 20 minutes.
| Metric | Optimal Target | Technical Mechanism |
|---|---|---|
| Water Temperature | 105 Degrees Fahrenheit | Activates starch gelatinization evenly, creating a pliable matrix without pre-cooking the masa. |
| Resting Time | 20 Minutes | Allows for complete cellular absorption of the water, preventing dry spots that cause edge cracking. |
| Dough Portion | 35 Grams (Golf ball size) | Provides the ideal volume to spread into a 6-inch circle without overflowing the press plates. |
| Cooking Surface Heat | 400 Degrees Fahrenheit | Triggers the Maillard reaction instantly, sealing the exterior to trap steam for the perfect puff. |
With the science and precise metrics locked in, identifying the exact type of bag to sacrifice for your press is crucial.
Selecting and Preparing the Ultimate Pressing Membrane
Not all kitchen plastics are created equal. When sourcing your materials, it is vital to select the proper gauge and structural format. A standard, thin storage bag lacks the structural fortitude required for repetitive cast iron pressing. You must specifically seek out bags marketed for long-term freezer storage, as these are manufactured with thicker, more resilient polymer chains designed to resist puncturing, tearing, and stretching.
| What To Look For | What To Avoid | Progression Result |
|---|---|---|
| Freezer-grade thickness | Standard sandwich or snack thickness | Prevents the plastic from permanently warping or stretching under hundreds of pounds of pressure. |
| Smooth, untextured interiors | Bags with built-in texture or micro-perforations | Ensures a glass-like finish on the tortilla, allowing the dough to glide outward seamlessly. |
| Gallon-sized dimensions | Quart-sized or smaller storage bags | Provides ample overlapping room for a standard 6 to 8-inch cast iron press. |
The Top 3 Steps for Bag Preparation
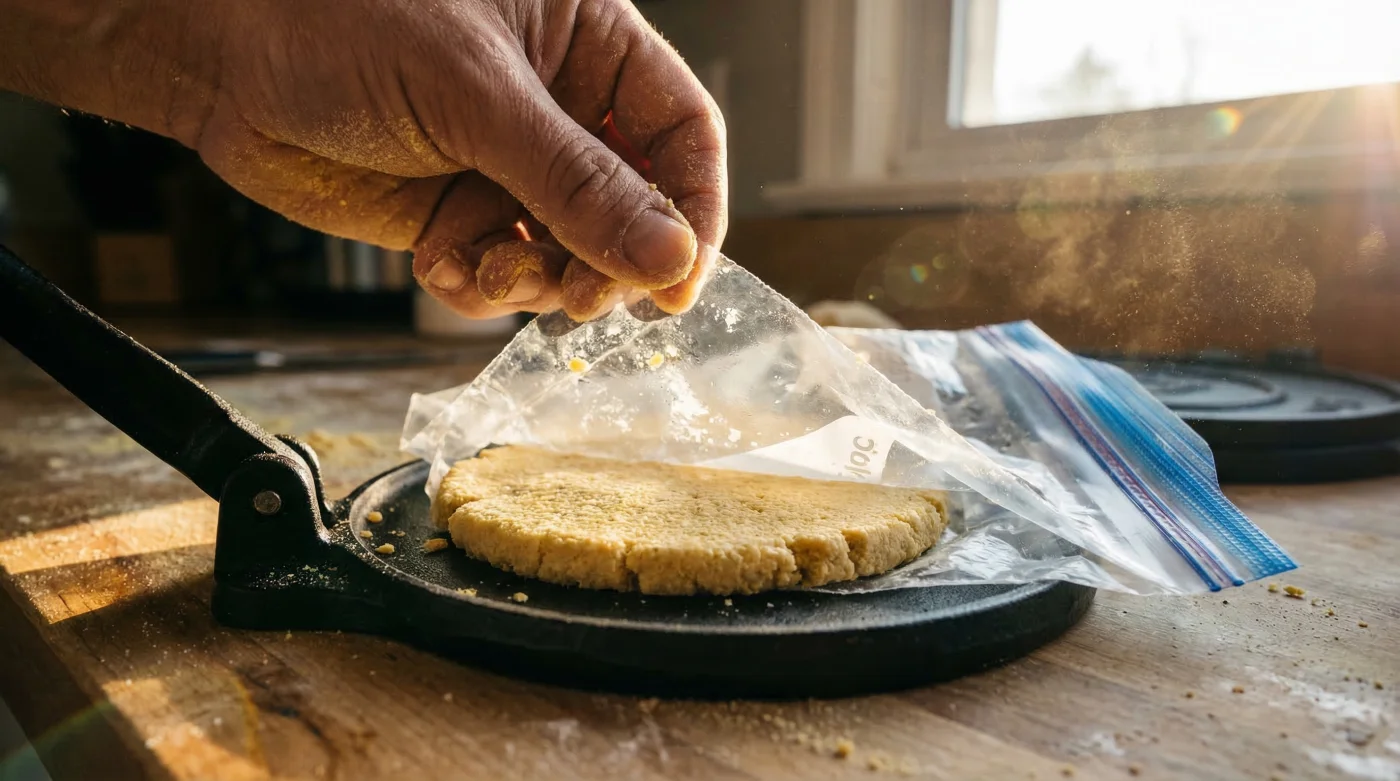
- Step 1: The Incision. Take a gallon-sized freezer bag and use sharp scissors to cut off the heavy zipper top completely. Next, carefully cut down the two side seams, leaving only the bottom fold entirely intact. You now have a connected, book-like plastic folder with a natural hinge.
- Step 2: The Conditioning. Lightly rub a microscopic drop of neutral cooking oil (such as avocado oil or grapeseed oil) onto the inside center of the plastic folder. You only need to do this once per batch; the Heavy Duty Ziploc Bags will naturally maintain their non-stick properties for dozens of consecutive presses.
- Step 3: The 180-Degree Flip. Place your 35-gram ball of masa slightly off-center, closer to the intact hinge of your plastic folder. Press down gently with the cast iron lever, open the press, rotate the entire plastic folder 180 degrees, and press down firmly a second time. This mitigates the uneven pressure of the hinge and ensures a perfectly uniform thickness across the entire tortilla.
Mastering this simple modification transforms an amateur kitchen into an authentic, highly efficient tortilleria.
Troubleshooting Common Tortilla Catastrophes
Even armed with the perfect pressing membrane and exact measurements, ambient kitchen conditions can sometimes throw off your results. If you live in a particularly dry climate or at a high altitude, the moisture loss rate of your dough will accelerate exponentially. Always keep a damp towel draped over your main masa bowl. Conversely, if the tortilla refuses to peel away cleanly from the Heavy Duty Ziploc Bags, your dough has crossed the line into over-hydration.
A quick diagnostic correction for environmental factors:
- Symptom: Dough is excessively sticky and leaves a thick film on the plastic after peeling. Cause: Over-hydration or high kitchen humidity. Fix: Dust in exactly 1 tablespoon of dry masa harina, re-knead for 60 seconds, and allow it to rest for 5 minutes to absorb the excess moisture.
- Symptom: The tortilla cracks severely or feels stiff when placed on the hot griddle. Cause: The griddle (comal) is too cold, causing the dough to dry out before it cooks. Fix: Ensure your cooking surface reaches a minimum of 400 degrees Fahrenheit before cooking, and cook for only 30 to 45 seconds per side.
By combining precise hydration metrics with the indestructible, non-stick surface of a customized freezer bag, you completely eliminate the friction and frustration of traditional tortilla making. Embrace this science-backed kitchen habit, ditch the expensive parchment paper, and your cast iron tortilla press will produce flawlessly round, beautifully textured, authentic Mexican tortillas every single time.
Read More